Hugelkultur (German for “gardening with mounds”) is a form of permaculture gardening that has been heralded as a way to end world hunger, because it offers sustainable gardening methods that require very little water: “Hugelkultur are no-dig raised beds with a difference. They hold moisture, build fertility, maximise surface volume and are great spaces for growing fruit, vegetables and herbs” (Permaculture Magazine). It is a unique method that can grow food in both boggy or desert landscapes–and everything in between.

The principle component of hugelkultur gardening is wood–and you can build the beds in a variety of configurations. It’s the perfect way to use fallen branches, whole trees, and woody detritus that you would like to recycle into new food for your family or community. Note, however, that some wood is not recommended for hugelkultur because it is either pest-resistant or toxic–scroll through this article from Permaculture Research Institute for a helpful list.
In addition, your hugelkultur bed is a beautiful place to put grass clippings, non-weedy plant material, straw, and home compost. The key to this method’s success is the circuit of heat created inside that slowly breaks down organic matter and releases nutrients into the soil. The soil becomes a haven for pests, is rich with nutrients (because those nutrients are less likely to drain into the groundwater), and is filled with air pockets for plant roots. Because the woody material holds water, you can skip watering the garden for weeks after the seeds have germinated (and sometimes for an entire season, depending on the height of the beds). This Rich Soil article has some great highlights and fun illustrations about the benefits of hugelkultur.
The big deal about these beds is that they require some extra work at the beginning, but hardly any work after you build them. Considering the time required to plant and harvest a garden, it can be a deal breaker if you don’t have to stay home to water the garden 2-3 times a day.
We spent months trying to figure out where to put our garden. We wanted to live here through all the seasons before deciding. Our property has a fairly diverse topography–it’s a mix of forest, lawn, marsh, and hills. We knew there were lots of places to expand, but we needed to start somewhere.

We also knew that another principle of easy home gardening is to keep the beds close enough to the main house that it won’t feel like a trek to get to the garden for a last-minute clipping of herbs or a quick harvest around dinner time. In the end, we settled on an area that was sloped, soggy in the winter, and received full sun for most of the summer.
When we were finally ready to get started, I started spending my mornings dragging branches from the far-reaches of our property and placing them in piles.
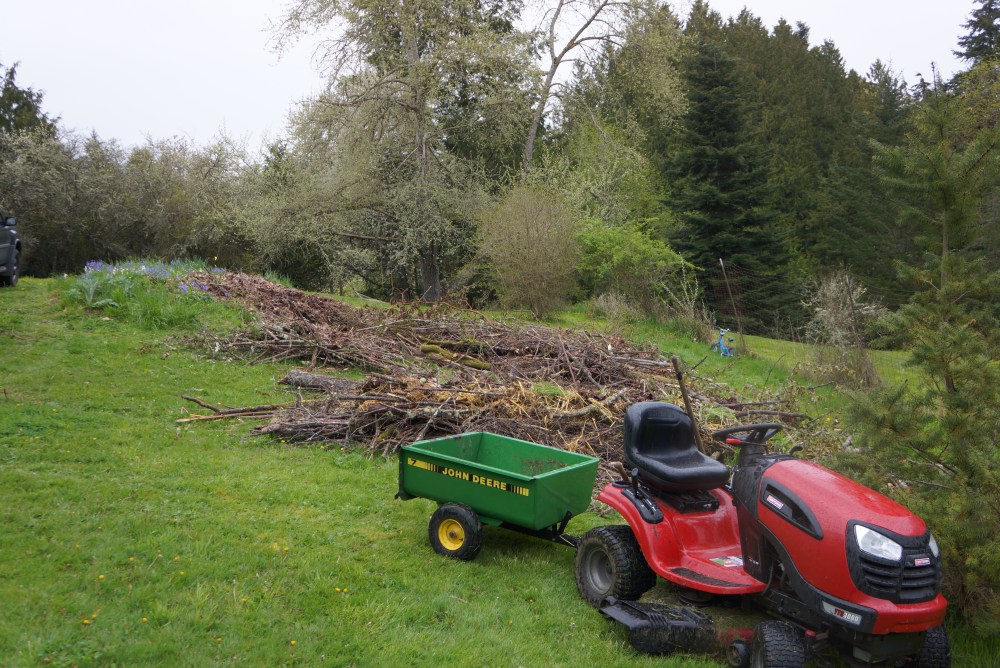
I also enlisted a day of help from a four-person team of gardeners. They made quick work of finding new material from the far-reaches of our property and piling it up.
The key is to start with the bigger logs, trunks, and woody material, and pile smaller and smaller branches as you build up, ending with twigs on the top layer.
We spent another few weeks trying to decide how we wanted to form them–one long bed, or several ones in a row? In the end, Brian drew up a design that we hoped would look natural and allow easy access to each bed for planting and weeding. We wanted the garden to look attractive when planted, and to create a little labyrinth for our kids to wander through and pull veggies from.

After piling and reconfiguring the wood, and getting help from neighbors and friends during the final stages, we added dirty chicken straw from our chicken coop, Soil Science Organic Fertilizer, weed-free grass clippings, fallen maple and alder leaves, and–finally!–dirt. We used a combination of Oly Mountain Fish Compost and an organic topsoil from a local soil company. They mixed the dirt on site and arrived at our place with huge trucks that they dumped into our driveway.
That’s when Brian started the real work of the project: Getting the dirt down to our garden beds, which was a huge project on its own. It was a fairly long way to go bumping down a hill and through our yard in a huge tractor. He worked for a full day or two on gathering and dumping dirt on each bed.


Under more normal backyard circumstances (like the hugelkultur garden we made at our last house), a wheelbarrow and a set of good shovels and arms would have been plenty.
We had our beds created by early spring, in time to still capture a ton of rain from the rainy season. I amended it a few times with organic fertilizer, and then we finally planted all our seeds–winter greens, summer lettuces, arugula and spinach, squashes and cukes, broccoli, carrots, beans, peas, borage, nasturtium, and more. We used tomato starts that I found at our local garden store.
But the true test was still ahead: Would it require water after the initial watering required to get the seeds to germinate, and beyond any summer storms we might get throughout the dry months? We watered it plenty at the beginning, feeling a certain parental angst about how it would turn out–would it grow anything? Would all our hard work pay off?
As it turns out, we would discover the benefits of this method during one of the longest, hottest summers we’ve had here in awhile. So long and hot, in fact, that our irrigation well dried up.

I was amazed at the large, fleshy kabocha squashes that grew heartily. And the massive blanket of water-filled cucumbers that produced endless pickling cukes.

Brian installed a few basic steps between a couple of the beds. We are covering them with rock this year to make them look a bit more finished, and to keep the weeds down. The funny thing is, we didn’t really get any weeds in the hugelkultur beds. It was the most low-maintenance gardening experience I’ve ever had.

And it was fun for the family to run around the yard and collect fruits and vegetables. Here’s Brian taking a break from picking fruit from the upper branches of one of our pear trees. I set him up in front of the squash and cucumber bed so we could get a sense of scale.

Looking over these photos, I remember how dry our lawn was, but our garden was still happily growing and producing without water after 4+ weeks without rain.


There are a ton of resources about making permaculture work for you. I would love to see more communities invest in this kind of gardening, especially in difficult climates.
